Providing proof for your 'Virtual Event' ride
Firstly, in order to be eligible to do a 'Virtual Ride', this has to be approved by the organising group ahead of time.
We will not generally permit entries into the event knowing that you do not intend to attend the event. All entries into this event need to be made with the intention of attending the event on the event weekend.
If you have completed a legitimate entry into the event, and have paid your entry fee, only to find that a legitimate reason prevents you from being able to attend the event, the organising group may, at their discretion provide approval for you to complete your ride at a later date. You may need to explain and satisfy the organising group that a legitimate reason then exists which you did not previously know about when you completed your entry.
It has never been the intention of the organising group to allow entries by individuals who might originally plan to do our rides at a later date, when the weather might suit them better, or when other timing considerations might simply be more convenient for them. This approach significantly takes away from the event itself by reducing expected numbers, reducing income for our hosting partners, such as Kings etc. We will not knowingly permit riders to plan to take this approach. (We had 25 no-show riders for the NI800 in 2023)
If you simply do a no-show on the day, do not expect us to review any virtual ride which you might perform later. We will only review, and issue finisher's status to those riders who specifically make arrangements with, and have the prior approval of, the organising group.
If you simply do a no-show on the day:
We will not generally permit entries into the event knowing that you do not intend to attend the event. All entries into this event need to be made with the intention of attending the event on the event weekend.
If you have completed a legitimate entry into the event, and have paid your entry fee, only to find that a legitimate reason prevents you from being able to attend the event, the organising group may, at their discretion provide approval for you to complete your ride at a later date. You may need to explain and satisfy the organising group that a legitimate reason then exists which you did not previously know about when you completed your entry.
It has never been the intention of the organising group to allow entries by individuals who might originally plan to do our rides at a later date, when the weather might suit them better, or when other timing considerations might simply be more convenient for them. This approach significantly takes away from the event itself by reducing expected numbers, reducing income for our hosting partners, such as Kings etc. We will not knowingly permit riders to plan to take this approach. (We had 25 no-show riders for the NI800 in 2023)
If you simply do a no-show on the day, do not expect us to review any virtual ride which you might perform later. We will only review, and issue finisher's status to those riders who specifically make arrangements with, and have the prior approval of, the organising group.
- Double badger entrants are an obvious exception to the above, we expect you to need to do a Virtual Ride, you have automatic approval, assuming that you turned up at the event and tried to complete a ride on the day.
- People who entered, turned up on the day, failed to finish their ride are very welcome to re-try their ride at a later date as a Virtual Ride.
If you simply do a no-show on the day:
- we will not refund any entry fee, and
- we will not verify your ride as a Virtual Ride.
Approved Virtual Riders can complete their ride(s) during the 12 months following the event.
When you do this at a time other than on the ride weekend, there is less supervision and less direct involvement and checking done by event staff. As such we need more proof from you that the ride was completed in the way which we expect it to be. We call these ride attempts 'Virtual Rides'.
Historically we've always been particular about checking each rider's photos to ensure that 'finisher's status' is only awarded to people who have managed to complete these challenging rides. That will be no different for Virtual Riders.
YOU DO NOT HAVE TO START / END YOUR RIDE IN OHAKUNE.
- If you are taking part in a Virtual Event option, then you can choose where along the route you would like to start.
- Your START / END receipt will have to be at the same business. Choose this carefully based on what is going to be open when you finish your ride! This point MUST BE ON THE ROUTE.
- You need to ride the route in the prescribed direction. (As outlined both in the route sheet, and indicated by the number details on each of the checkpoints - do them in numerically ascending order (smallest first, through to the largest number), using your own staring point, work through to the Ohakune, then continue on through the lower numbers back onto your own Start / End point.
- If you do not start / end in Ohakune, then you must also add in a checkpoint in Ohakune, either at Kings, or a documented fuel stop in Ohakune, do this as an extra photo checkpoint, call it CP00.
How are we going to check your ride?
You are all well prepared for photo checkpoints, so you'll all have some form of digital camera sorted for your ride.
We're asking you to extend the use of your camera to capture all of the following:
We're asking you to extend the use of your camera to capture all of the following:
- A selfie before you start your ride, showing you and your bike.
- If you're riding in a group of people, then we'd like a group shot too.
- A start receipt, photographed with your bike's odometer (ODO). *
- All of your checkpoint photos clearly showing your bike at the required stops.
- An end receipt, photographed with your bike's odometer (ODO). *
- For riders on the NI1600 route, we have already requested a SpotWalla trip. Now that things are virtual, this has become even more important. Each NI1600 rider is required to make a best-efforts attempt at capturing a full, and working SpotWalla Trip showing your entire ride. In the case that you make a fair effort to do this, but you fail - you can request that we consider using a fully time-stamped GPS track taken directly from your bike's GPS (assuming you have one) but you'll have to show a fair and exhaustive effort before we'll accept this.
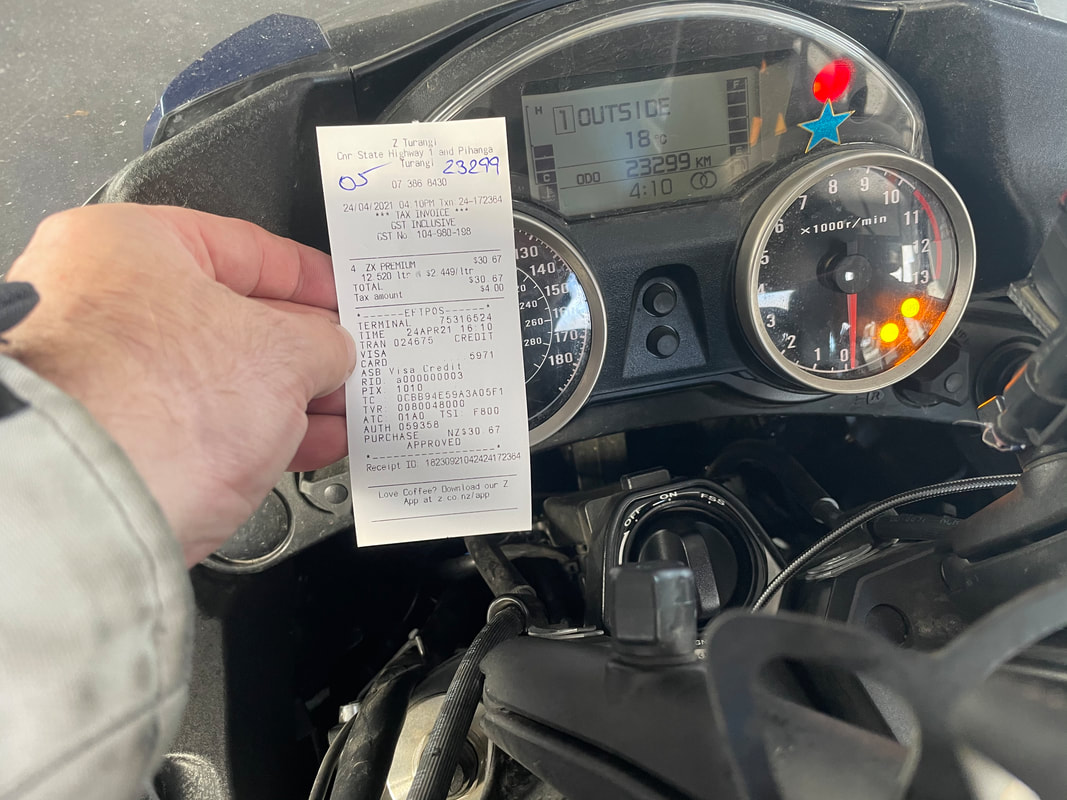
Example of an 'ODO' photo for start / end receipts *
- Here's a sample of what we need for #3 above. - This is commonly a fuel receipt, but it doesn't need to be, it can be any printed, business receipt which shows the address of the business and the time and the date. You can use ATM receipts or balance printouts if they contain the address on the printed paper. ALWAYS write your ODO number onto your receipts before you photograph them.
- When you're ready to officially start your ride, go and fill up. We recommend a local 24h fuel station with pay-at-pump, don't forget your receipt.
- Shift your bike's odometer display to show your bike's overall km travelled. Please DO NOT USE A TRIP METER distance, that's no good for ride validation purposes.
- Grab the receipt and hold it carefully next to your ODO, make sure that the time / date is clearly shown on the receipt. - Take a photo of it, this is your start receipt photo.
- When you end your ride, repeat steps 1-3 for your end receipt.
If it's done well, then it should look like this:
Where do I send all of this?
Send us an email with your full name, your contact phone number and all of the items required for us to check your ride to: [email protected]
We'll let you know if we need anything further from you.
THANK YOU. ENJOY YOUR RIDE!
We'll let you know if we need anything further from you.
THANK YOU. ENJOY YOUR RIDE!